|
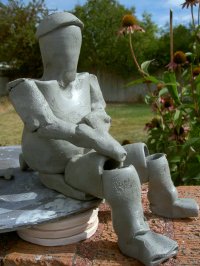
Clay Pot PeopleHere is a pattern for clay pot people like you've never seen before.
They also make great homemade gifts. Hopefully, you'll want to make one for yourself. If you can throw a small pot, you can make a clay pot person. It just requires throwing 15 small pots and then assembling them into the shape of a figure.
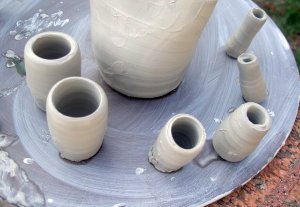
Click here for tips and tricks for making mini pots on the hump. Some of the pots are flattened a bit to make your person more life-like. Each pot has one open end and one closed end, just like you would throw a regular pot. Getting StartedFirst, throw the largest pot, which will be the body of your person. (The above photo is of a body, 2 upper legs, 2 upper arms, and 2 lower arms.) The size of all the other pots will be based off of the body pot. This helps you get the scale correct. Then, throw a smaller pot for the head, and a small, shallow bowl for the hat or hair. Next, throw 2 upper legs, 2 skinny lower legs and 2 small feet. Finally, throw 2 upper arms, 2 skinny lower arms and 2 small hands.
Assembly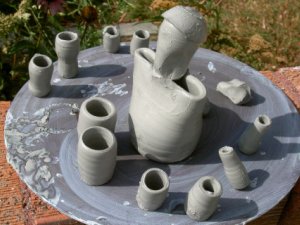
Here you can see all of the parts and the beginning of the assembly process. To assemble, refer to the photo of the completed figure at the top of the page. Use it as a pattern for attaching your mini clay pots. Assemble the pots while they are still wet. This is a little messy, but they attach well to each other when wet. You can always smooth your project with a sponge after it has been assembled. Place a small disc of clay under the body. This functions as the person's butt. It also helps to keep the body connected to the legs. Also, flatten the hands and feet. Next, squeeze the head in a little to make it more of an oval shape. Add the hat or hair, and stick the head onto the body. Make sure it is attached and is supported well by the body. Finally, attach the arms, legs, hands, and feet. Tip #1: The slip that is on the surface of the pots will act as a glue to hold them together. Tip #2: Prop up the butt of your person using an extra bat or a box. This allows the legs to dry in a more natural position. Tip #3: Poke a small hole in an inconspicuous spot on the head so the air can escape during firing. I hope you enjoy this unique version of how to make clay pot people. Thanks for reading, and Happy Potting.
Return From Clay Pot People |
Learn Right
The First Time
Pottery on the Wheel for Beginners
is a complete beginners guide
to learning pottery.
It will
take you from
never having touched clay
to creating finished pottery
you can use every day.
Also read it on Kindle
Featured Pages
Choose Your Wheel
Thank you so much for
visiting my website!
Discover How I Made It!
Happy Potting!
- Steve


