


|
Painting Clay Pots with GlazeThe most exciting part of pottery is painting clay pots with acrylic paint or glaze. Kids of all ages can enjoy ideas and instruction for outdoor or indoor pot designs. This is your opportunity to add color, flare, creativity, and durability to your ceramic creations. Painting clay pots can be done with acrylic paint for a decorative finish or with ceramic glaze for a more permanent finish. 
We're only discussing electric kiln for now because they are the most commonly used, the most readily available, and the simplest to learn initially. The four factors are - Firing Temperature - Type of Glaze - Protecting the Bottom - Method of Application. You could spend a lifetime experimenting with just these four different factors. When you're ready, learn how to use pottery glazes that will bring your pots to life. To help keep things simple for now, let's focus on our four main glazing factors. Tip: Keep a ceramic journal to document your techniques, results, and experiences as you go. Firing TemperatureWhen painting clay pots with glaze, firing temperature is very important. Pottery glazes are designed to work well when fired to specific temperatures. Fire too cool, and the glaze will be chalky and won't attach to the pot. Fire too hot, and it will melt, drip and crack. The important thing to remember is to select a glaze that is designed to be fired to the same temperature as your clay. This helps you to achieve a good "fit" between pot and glaze. Commercial clays will indicate what "cone" they should be fired to.
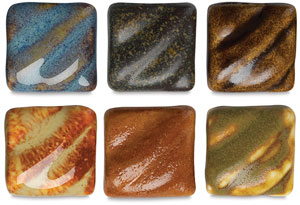
Type of GlazeOnce your have determined the firing temperature of your clay it's time to select your glaze. This is where you get to decide how your pot will look. Will it be red, green, or brown? Will it have a glossy or matte finish? Will it be thick, thin or drippy? When you're starting out I recommend using a non-toxic, commercially prepared glaze like the Amaco Classroom Pack 1, Set of 6 The benefit is that the glaze has already been painstakingly formulated and tested for you. This gives you a chance to focus on your glazing techniques and firing skills. Once you have those mastered, you can experiment with formulating your own
ceramics glaze recipe.
Protect the Bottom of the Pot with WaxSo your pot has gone through the bisque firing and it is ready to be glazed. Waxing is the first step before we apply the glaze. When fired, glaze actually melts. If there is glaze on the bottom of your pot, when it melts it will fuse your pot to the kiln shelf that your pot is sitting on. This makes a nasty mess and tends to ruin the pot and damage the shelf. Therefore, before covering it with glaze we'll wax the bottom of the pot. There are two ways to do this. The best method is to melt candle wax in a pan on a low temperature, then dip the pot gently into the wax. The wax should come about 1/4 inch up the side. You'll have to add small amounts of wax as you go to keep the level at 1/4 inch. Be careful not to overheat the wax as it is flammable. Tip: Find an old frying pan that you won't miss and designate as your waxing pan. The wax is very difficult to remove from a nice pot once you've started melting it. Plus, if you let the wax cool in the pan when you're done, it'll be ready for you at just the right level next time you're glazing. The second method is wax resist. This is a liquid wax that requires no melting. It is great if you don't want to deal with the heating. However, it's more tedious to apply and it tends to stick to everything, like your fingers and the sides of your pot. I generally reserve this wax for other types of decorative work. When your pot is dry, sponge off any glaze that remains stuck to the wax. When you fire the pot, the wax will simply burn off, leaving a clean, glaze-free bottom on your pot. Applying the GlazeHere are four different ways to apply the glaze to your pot. Tip: Always be sure to stir your glaze thoroughly before dipping. Dipping: The simplest method of glazing is to dip the whole pot into a bucket of glaze. This method is much quicker than painting clay pots with a brush. To dip, hold one thumb on the rim of the pot and your fingers on the waxed bottom. Dunk the pot into the glaze. Be sure the glaze covers the whole pot, inside and out. Lift it out of the glaze upside down and shake it to remove excess glaze. Set it upright to dry. Dab a small drop of glaze onto the rim where your finger was to smooth over the hole. Tip: The thickness of the glaze on the pot is very important. Small differences in thickness can completely change the color and characteristics of a glaze. I usually have to add a little water to commercial glazes. You can use a hydrometer to measure the water content of a glaze to help get consistent results. You will also get a good sense of how thick a particular glaze should be as you work with it over time just by touching it. Some commercial glazes are formulated for brush application only. I have used many of these to dip pots with good results, but they don't all work with dipping. Some glazes are specifically formulated for use in dipping such as the Amaco Potter's Choice Glazes Pouring: If you have a limited quantity of glaze, or have an oddly shaped pot that will not dip well, you can pour the glaze over it. All you need is enough glaze to cover the pot and a wide bowl to catch the drips. This technique takes some practice to get the coverage right. The key is to plan ahead. It is usually best to pour the inside of the pot first. Rotate the pot until the inside is covered, then dump the excess glaze out. For the outside of the pot, pour steadily and rotate the pot until all areas are covered. Try to minimize excessive overlapping of glaze. Some overlap will be unavoidable. Painting: Painting clay pots with glaze is especially effective when you only have a small amount of glaze or when you are creating a specific design on the pot. The manufacturer will specify how many coats you need to apply. Usually, it is two to three. If you are painting clay pots with glaze in a design, be aware that glazes become fluid when they melt. Your design may be blurred or ruined in the firing. Test your glaze first, or check with the manufacturer. If you are doing very detailed designs you'll likely want to explore other options for painting clay pots like slips, stains, or engobes. Spraying: Spraying is a very effective and efficient way to paint clay pots with glaze. The main drawback is that it requires a sprayer and a vented spray booth. It also requires cleaning the sprayer. However, it certainly has it's benefits. Not only does spraying provide great opportunities for even coverage, it also allows you to create interesting surface effects by layering different glazes one over the other.
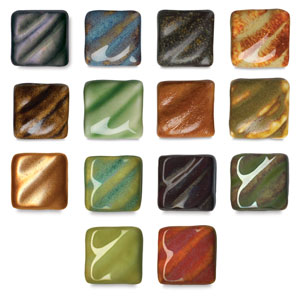
This is only an overview of the possibilities for painting clay pots with glaze. Experiment with these, find one that suits you, and then push the limits of what you can do with it. To see a wide selection of glaze colors and effects check out the Amaco Potter's Choice Glazes Thanks for visiting, and Happy Potting.
|


Learn Right
The First Time
Pottery on the Wheel for Beginners

is a complete beginners guide
to learning pottery.
It will
take you from
never having touched clay
to creating finished pottery
you can use every day.
Also read it on Kindle
Featured Pages


Choose Your Wheel
Thank you so much for
visiting my website!
Discover How I Made It!
Happy Potting!
- Steve