Clay Pot Projects
Making a Teapot
Ceramic teapots are among the most challenging clay pot projects to make. Find ideas and lesson plans for how to create teapots from spout with infuser to lid to handle.
Teapot Body
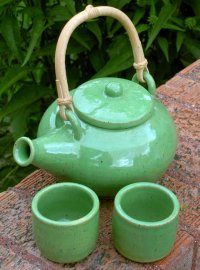
The first step in making a teapot is to form the body. For a medium sized teapot throw a 7" x 7" bowl that is closed in on the top.
This should require a ball of
pottery clay
about the size of a small cantaloupe.
The opening should be 2-3" wide to fit the lid. Measure the opening while the teapot is still wet, and make note of it so you can use the measurement for your lid.
Leave the rim rounded and a little thicker for strength. Cut the body free from the wheel head, and set it aside uncovered to dry a bit.
When the rim becomes leather hard, carve 7 small holes where the spout will be. Use a heavy milkshake straw or a clay cutting tool.
These holes serve to keep the teabag from getting clogged in the spout. Keep them close enough to be contained by the spout but about 1/2" away from each other to maintain the strength of the wall.
To create a teapot with infuser you can throw a small cup and cut holes in it. It can either be attached to the inside of the spout or placed loosely into the opening.
Turn the pot upside down so the bottom can begin drying. After it is firmed up, you can trim it on the wheel or, if your pot is light enough, simply smooth the bottom.
It's best to indent the center of the bottom about 1/4" to create a subtle foot. This allows the pot to sit flat on the table without wobbling.
Teapot Lid
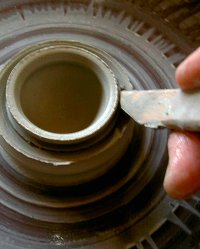
Next you'll create the lid to your clay pot project. Use a ball of clay the size of a small apple. Open the hole in center, then pull the clay up just a bit.
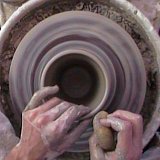
Using a clay knife, divide the wall in half as shown in the photo on the right. Throw a 1 and 1/2" tall cylinder with the inner clay.
Measure the outside of the cylinder to be about 1/4" narrower than the inside of the rim on the teapot body, so between 1-3/4 and 2-3/4".
Pull the excess clay on the bottom outward to form a shallow dish beneath the cylinder. Cut the lid free from the wheel using a clay wire and set it aside to firm up.
You may need to take a break for a few hours or work on some other clay pot projects while the lid dries. Turn the lid over as soon as the cylinder is firm enough to support it.
Once it is leather hard you can
trim your lid on the wheel.
First, recenter the lid on the wheel. It will be upside down from how you threw it. Fasten it in place gently using small balls of clay.
Then trim the top using a sharp clay trimming tool. You can vary the shape to your liking. Just be sure not to trim through the top.
You can also add a handle to the top when your are finished using a small coil or simply gluing a small ball of clay on top with some slip. I personally prefer mine with no handle.
Set the lid aside to dry.
Note: It should fit nicely inside the rim of the teapot. Once they are both leather hard you can gently double check the fit to make sure one or both do not need further trimming.
Teapot Spout
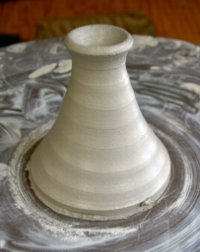
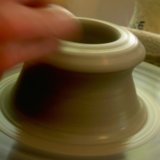
Now, using another apple sized ball of clay, throw a 4" cone without a bottom as in the photo on the right.
Thin the edges of the rim to a soft point, so that water will drip off of it, not down the teapot.
It should also flare out just a little, and the opening should be at least a half inch in diameter.
If it is too narrow the hole will close up once after the pot shrink in the kiln and has a layer of glaze added to it.
Cut the spout free and allow it to firm up a bit.
Teapot Handle
I'm sure by now you see why this is one of the most challenge clay pot projects. I always try to make sure I have a full day to work on a teapot so I can give my full attention to each of the steps in the process.
To make a handle you have a couple of options. My favorite is to create little loops on either side of the lid and add a bamboo handle (available at ceramics supply stores). Or you can add a small loop of clay to the back of the pot if you want a 100% clay teapot.
To make the loops, pull or coil a pair of 2" strips of clay. Curve them into a horseshoe shape, and attach them to either side of the rim.
Warnings:
1) Be sure the loops are sturdy enough to support the weight of a teapot full of water.
2) Be sure they allow adequate room for the lid and the spout. This space can get a little crowded, so do a little mock assembly to lay it all out before you attach them.
3) Be sure the loops are big enough to accommodate the loops on the bamboo handle.
Assembling Your Teapot
Finally, the fun part, putting it all together. Once you see how cool it looks all assembled you'll see that this is one of the most satisfying clay pot projects you can make.
So your lid fits, you've added loops in the right spot, and you've cut your holes for the spout. Now it's time to add the spout.
First, determine how long your spout needs to be and the angle that it will sit on the pot. Then, hand carve the spout, using a clay knife, so that it sits against the pot correctly. Finally, score the surfaces where it will be attached, add some slip for glue, and attach the spout.
Tips:
1) You'll have to cut the spout at about a 20-30 degree angle for it to fit right. You want the opening of the spout to be higher than where the top of the water is when the teapot is full.
2) Go around the spout where you've attached it with a finger or fingernail to smooth the transition. For even more refinement smooth over the seam with a damp brush.
Now step back and marvel at your accomplishment. If the first one isn't perfect don't be concerned. It never is. Just try again another day and improve upon your last effort.
I hope you enjoy this and all of the other clay pot projects you make, and happy potting.
Return From Clay Pot Projects - Teapots
To Advanced Clay Pot Patterns
Return From Clay Pot Projects - Teapots
To Pottery on the Wheel Home
Enjoy this page? Please pay it forward. Here's how...
Would you prefer to share this page with others by linking to it?
- Click on the HTML link code below.
- Copy and paste it, adding a note of your own, into your blog, a Web page, forums, a blog comment,
your Facebook account, or anywhere that someone would find this page valuable.


