|
How To Make Homemade Clay - Testing ItWhen learning how to make homemade clay for your clay pot projects it is also important to test the homemade clay. If you've mixed up a recipe for homemade clay , testing it will tell you a lot about the characteristics of that clay. This helps you to determine how well it will work for specific projects. Here are instructions for conducting four simple tests for your homemade clay:
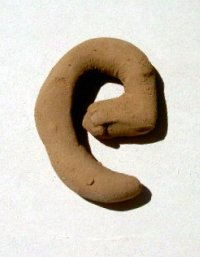
Workability- Otherwise known as plasticity or throwability. How far can the clay stretch before cracking? To the right is an example of a coil test. This is a quick, easy test to start with when learning how to make homemade clay. You simply roll the clay into a coil using your hands, and then form a lower case "e" with it. You can get a good idea of how plastic or workable it is by how the clay bends. If the clay cracks at the corner of the "e", then you know that is a less plastic clay. If it bends easily without cracking, as in the photo, you have a more plastic, workable pottery clay. The clay in the photo is from a clay sample that my friend dug from the ground in Eastern Idaho. Shrinkage- How much will the clay shrink when dried and fired? This ranges from 5-20%. Most wheel thrown pottery ranges from 8-15%. To measure shrinkage, roll out a strip of clay five inches long by two inches wide. Carve a line into the clay exactly four inches long. Dry and fire the strip of clay to the desired cone. This will cause the clay to shrink. Re-measure the line on the fired strip. Divide the amount that it shrunk by four to get the rate of shrinkage. Example: If the line on your fired strip measures three inches, then your sample shrunk one inch. One divided by four equals .25 or 25%. That means your clay shrinks at 25%. Example 2: If the line on your fired strip measures three and a half inches, then your clay shrunk a half an inch. One half divided by four equals .125 or 12.5%. That means your clay shrinks at 12.5%
If you're working with an established recipe for homemade clay, of from a powdered clay mix, you'll already know what cone the clay is designed to be fired to. Even in this case, it can be good to test fire it. Firing pottery clay will help you determine if it matures at the correct temperature. However, if you're digging clay from the ground you'll need to test it more thoroughly. First, fire your clay to a middle range temperature of cone 2 using
pyrometric cones
. Then examine the clay to determine whether it has vitrified. It should be thoroughly fused, but not glassy, not melted, and not porous. If it is difficult to determine, you can try testing it's absorption rate (see absorption test below). If it is glassy or melted, it's been over-fired. Fire another sample to cone 02 and examine it again. If it is too porous, like bisque, it's been under-fired. Fire another sample to cone 5 and examine it again. Keep firing until your reach a mature, vitrified clay body. It takes a bit of trial and error when first learning how to make homemade clay to get just the right cone. Absorption- How quickly will the clay absorb moisture after it is fired to maturity. This ranges from about 1-14% for most wheel thrown pottery. When first learning how to make homemade clay a quick absorption test can be done by filling the bottom of your fully fired, unglazed pot with water and setting it on a paper towel. If after an hour there is any moisture on the towel, your pot has a fairly high rate of absorption. If the towel is dry after several hours, the clay's absorption rate is low. Here is a more involved, but more accurate way to test absorption. Weigh your fired, unglazed pot using a gram scale or accurate digital scale. Then boil it in water for two hours. Towel dry the pot and weigh it again. The difference in the weight divided by the original weight is the absorption rate. Example: If your pot weighed 1 pound before firing and 1.15 pounds after boiling, your absorption rate would be 15%. This would indicate either a highly absorbent or an under fired clay. Example 2: On the other hand if your 1 pound pot weighed 1.03 pounds after boiling, your absorption rate would be 3%, which is quite a low absorption rate. This would indicate that you have a mature, water tight clay. Note: Functional pottery for use with food should generally have an absorption rate under 6%. Play with these different tests and really get to know your clay. Remember, these tests aren't essential to having fun making pottery. However, when learning how to make homemade clay, they are great tools to allow you a wider range of possibilities. Thanks for letting me teach you how to make homemade clay and test it, and Happy Potting.
Return From How to Make Homemade Clay Testing |
Learn Right
The First Time
Pottery on the Wheel for Beginners
is a complete beginners guide
to learning pottery.
It will
take you from
never having touched clay
to creating finished pottery
you can use every day.
Also read it on Kindle
Featured Pages
Choose Your Wheel
Thank you so much for
visiting my website!
Discover How I Made It!
Happy Potting!
- Steve


